Keeping the Past for the Future
KPF offers nine diverse programs for your classrooms, each offering a different learning experience through design, architecture and history in New York City. Our partner schools use our programs for both enrichment and curriculum extension, and we often visit the same classes multiple times throughout the year, building relationships with your students and increasing their depth and breadth of knowledge about their neighborhood and environment.
Each program usually comprises three sessions, generally one per week, with each session running up to an hour. We provide all the materials your students need – with remote learning we are committing to delivering materials prior to each session to your school, ready for either in classroom or at home learning.
Learn more about each program via the program toggles below – each provides specific program objectives, links to curriculum, materials and guidance. Any of our programs can be tailored to your classroom.
How do I Book a Program?
How is each program scheduled?
Each program consists of three sessions. Typically they are scheduled one session per week over three weeks, generally at the same time and day (e.g. three consecutive Wednesdays at 10am) . However, we do understand that schedules can change week to week, often at short notice, so we try to be very flexible to meet your availability! We also enjoy running a program for a whole morning or afternoon (allow three periods), and also ‘skip’ weeks as needed. We can also add sessions to programs if your class has a particular interest or project to complete.
How long is each session?
Each session runs for one period and can be run to fit anywhere between 45 minutes to an hour. If you have additional, or less, time, please let us know as we’re happy to accommodate specific requests. We can also add sessions to programs if your class has a particular interest or project to complete.
How much does the program cost?
Each program is FREE of charge to public schools on the Upper West Side. We charge a nominal fee per class for other schools – please contact LW! to discuss.
What do I need to provide?
When teaching in your classroom we bring all materials and worksheets with us. For Fall 2020, however, we will drop-off prepared packages for your students the week prior to your program commencing. The packages will include all the worksheets your students will need, ready for teachers to distribute.
How many programs can I book?
You can book as many as you like! We work with several schools that use our programs through the year to support curriculum. It is very enjoyable and rewarding to return to a school through the year.
I have an idea for a program/project.
Contact us! Many of our schools reach out with specific requirements or classroom interests and we love to help if we can.

Virtual Programs
Through April and May 2020 as our schools turned to remote learning, KPF successfully ran over 50 sessions with our partner schools, engaging over 400 students. Their engagement with the program was high and sustained, and the online platform enabled us to share many additional stories and details that we are not always able to do in the classroom. Each week we completed a drawing or art project, building on the skills and knowledge learned the previous week. Students enthusiastically completed their projects, and were always keen to share details of their work with their classmates.
We continue to offer our programs virtually. Our virtual programs can either stream live into your classroom, or students’ homes if learning remotely, and we will continue to engage, learn and draw as if in the classroom with you. Using either Zoom or Google Meet we can run the program live, engaging with the students directly through the session, and guiding them, step by step, through any drawing or art projects. We will provide all the materials your students need – with remote learning we are committing to delivering materials prior to each session to your school, ready for either in classroom or at home learning. It may also be possible for us to join your class outdoors in Session 2 of the program which is typically held outdoors.
“Our virtual Building Detectives session with Shannon was so successful. My students were engaged for the whole hour (amazing!) and it worked so smoothly over Google Meet with Shannon sharing photos and even doing a live brownstone drawing for us. We used the Google Meet chat function together as a class to complete the Building Facade worksheet collaboratively. Looking forward to our virtual walk next week!”
To book your own virtual program, complete the Inquiry Form at the bottom of the page or email us at education@landmarkwest.org.
Take a Look at a Virtual Classroom
Check out our short video recorded with PS 75 as we started our much loved Building Detectives program with one of their 3rd grade classes:
If you’ re interested, here is a longer version.
[Please note we edited both videos to exclude students faces and identifying information. They give you a brief overview of how the program can work virtually. The program was conducted via Google Meet and students used both the mute and chat functions throughout. ]
Teacher Testimonials
Another fascinating way to look at the past. Keeping it or starting with what they know, Upper West Side is key; I am also impressed with how focused and engaged my students are (considering they are on computers so much).
Your choice of maps, comparison photographs and skills with magnifying and keeping to the simple message of how we look and compare maps and photos was fab.
3rd grade teacher, Local History Detectives program
Thank you so much for a wonderful program! The students loved it and so did I!
Many thanks!
Kindergarten teacher, Shape Detectives program
Thank you for the great session today, Miss Shannon! I’m attaching pictures of the brownstones my students completed. What fun! And we can’t wait to see images (if/when you have them!) of the other kids’ brownstones too.
We’ve really enjoyed these sessions from the wonderful Landmark West and thank Miss Shannon for the taking time to do this with us!
2nd grade teacher, Building Detectives program
Examples of Students work
KPF Programs
Open the toggles to learn more about our Keeping the Past for the Future programs.
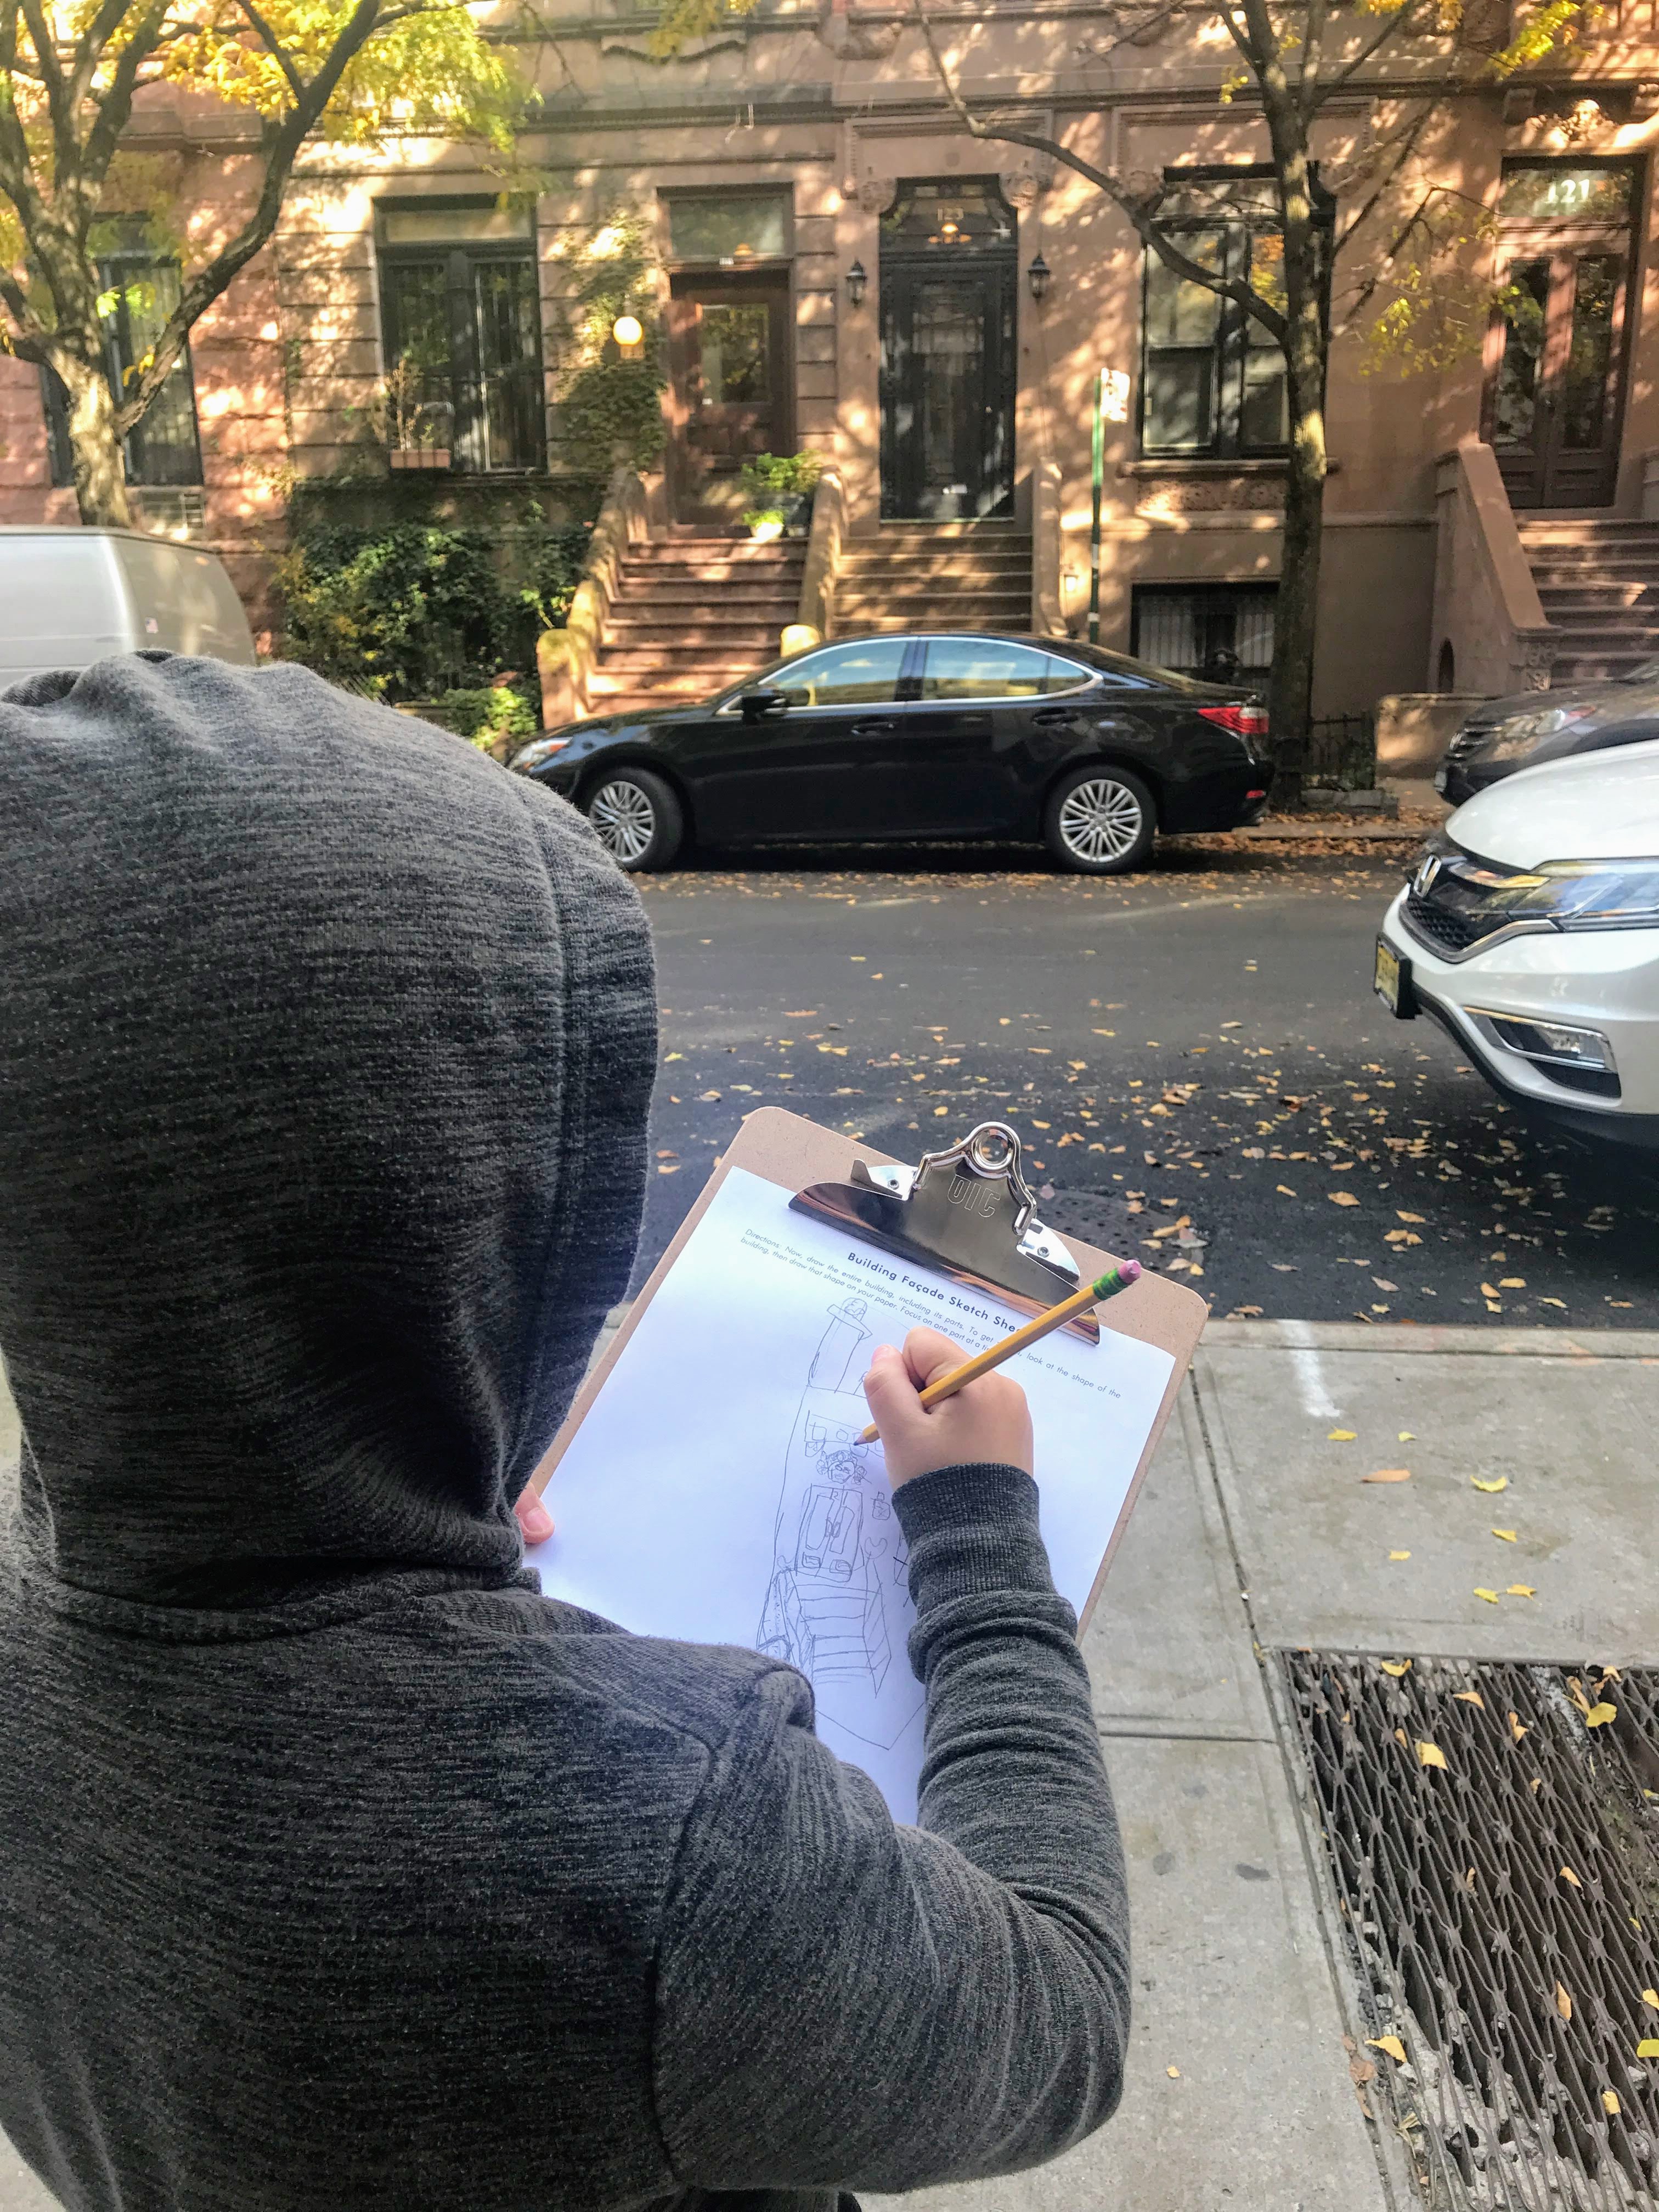
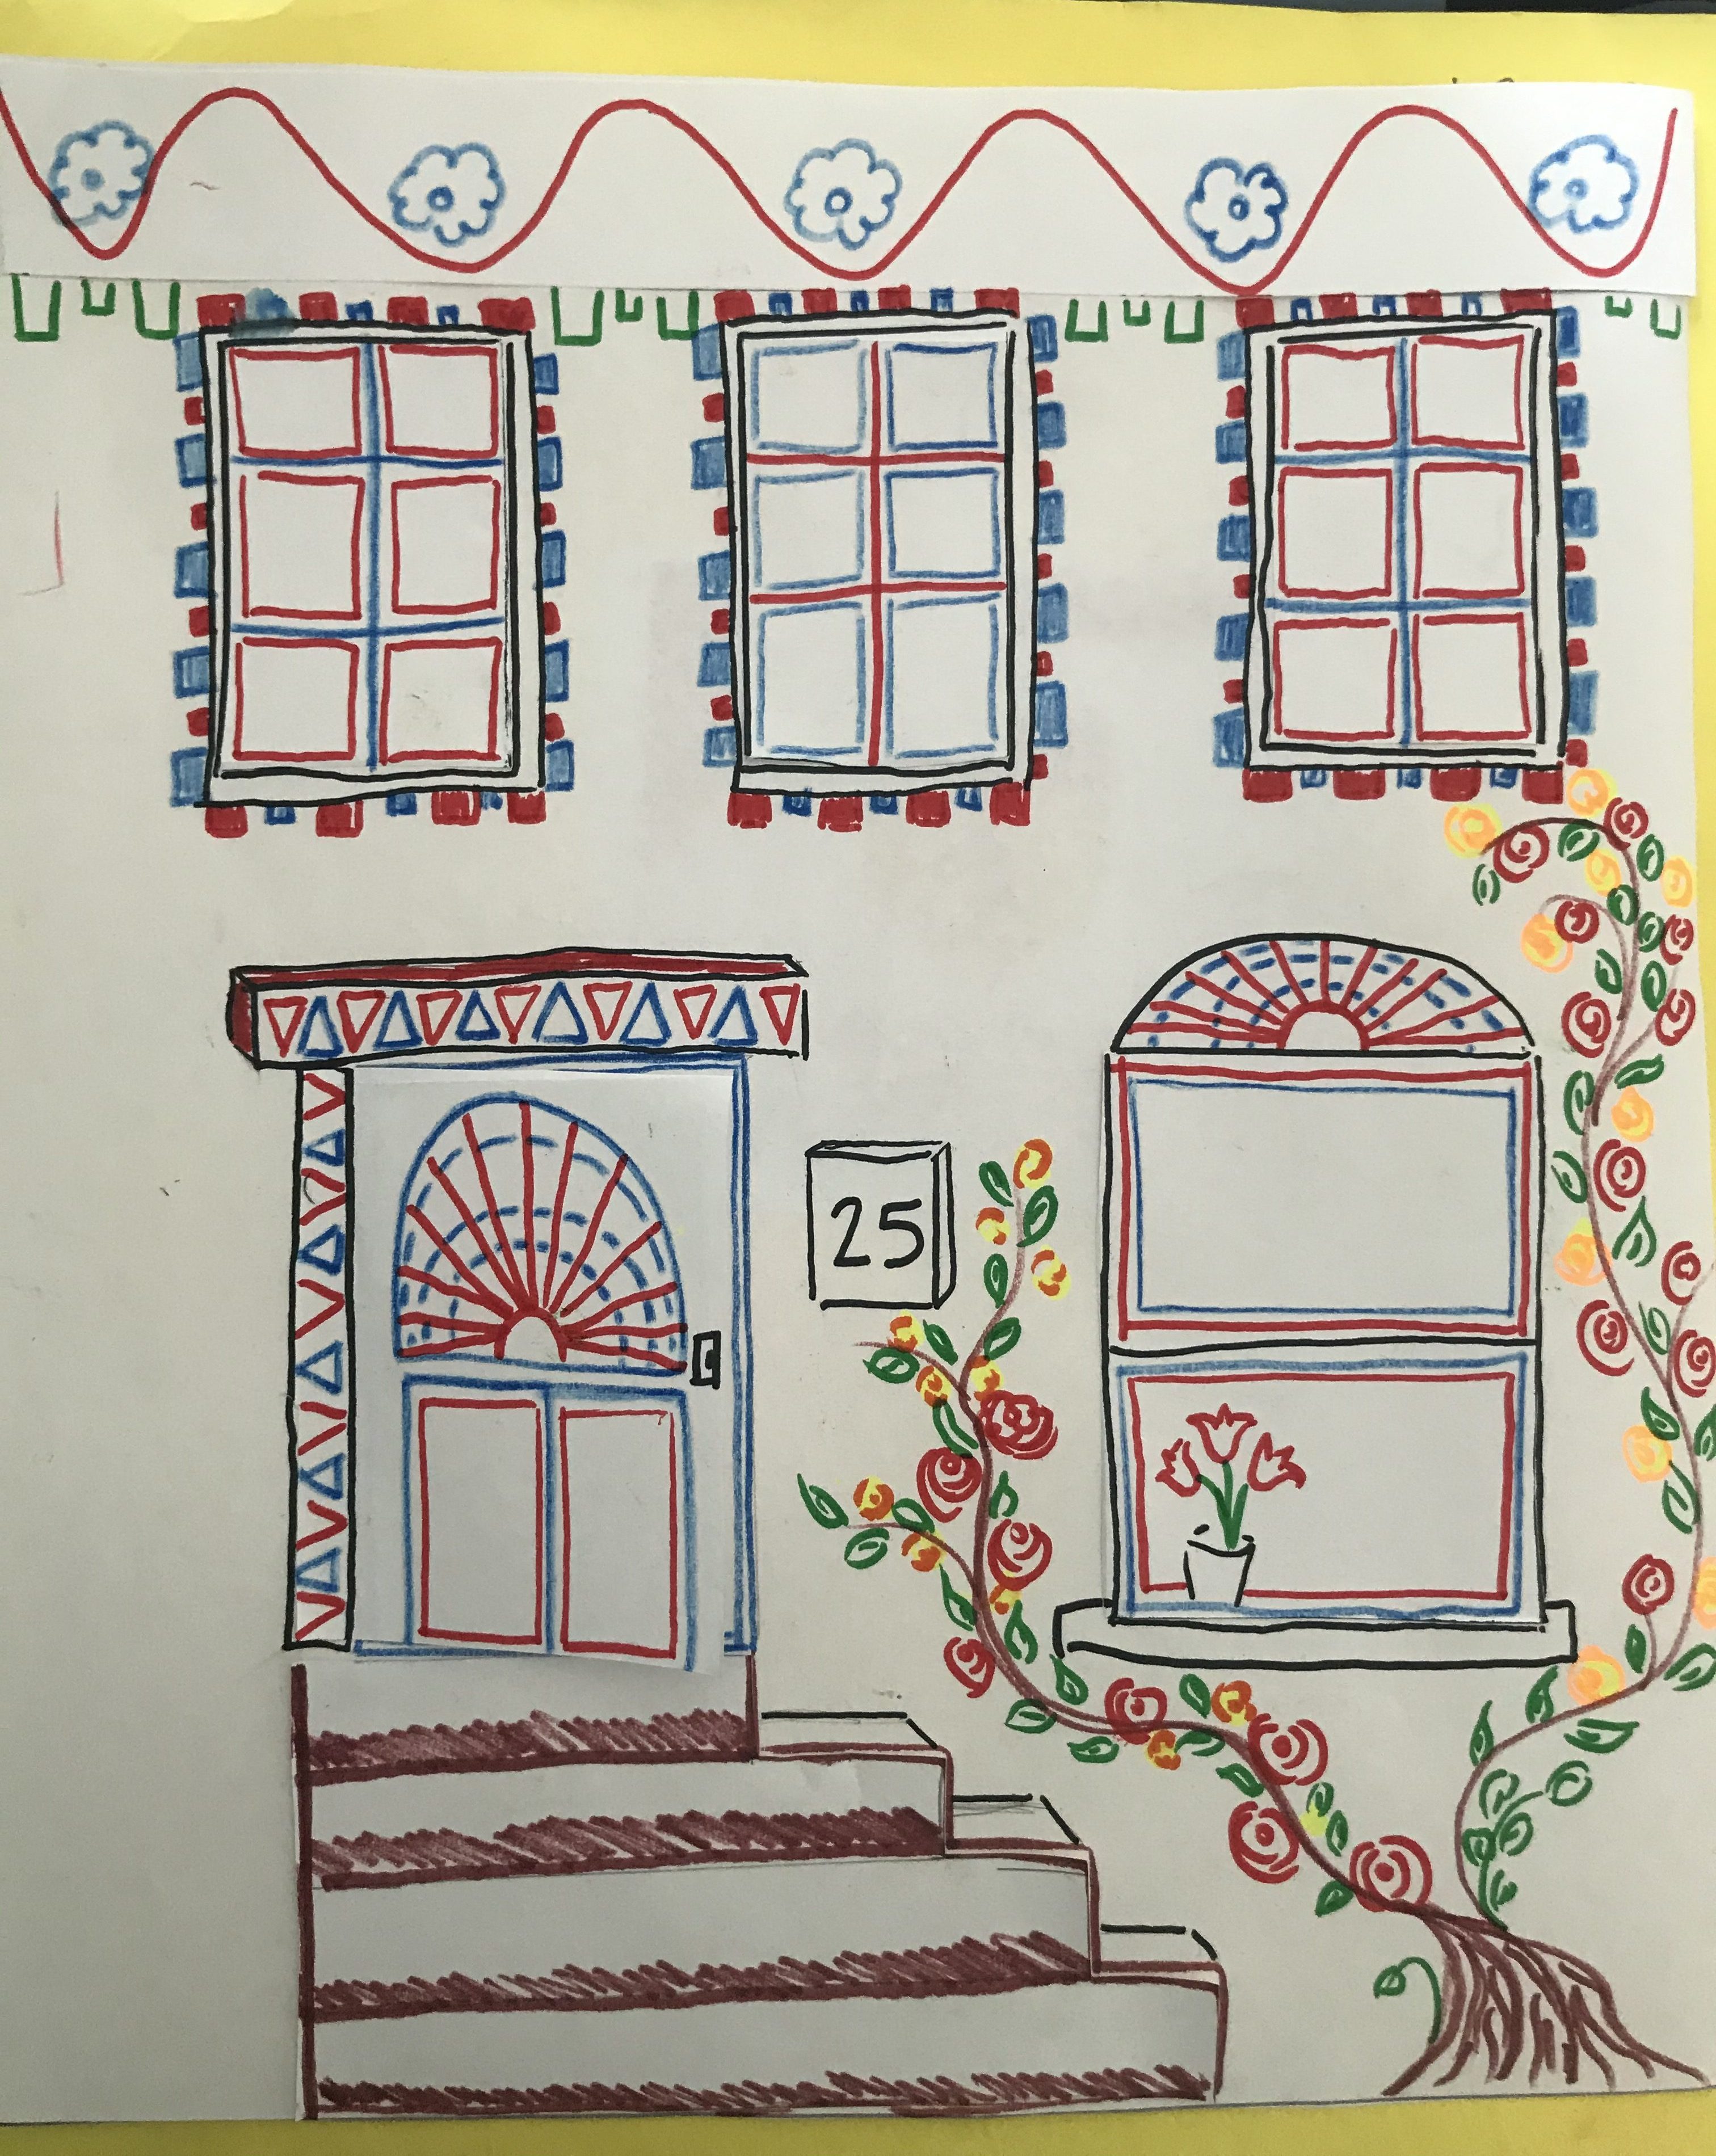
Building Detectives (Grades 1 and up)
Introduction
Through Building Detectives, students explore the basic elements of buildings and how these parts contribute to the larger structure. What is the job of a cornice? Why are stoops so special? In the first session, students learn about these building elements and then draw their own imagined buildings. In the second session, students go outside to identify parts and sketch building facades. Finally, using both their background knowledge and first-hand experience, students create a three-dimensional brownstone façade, which combine to create a streetscape model.
Program goals
- Students will gain knowledge of architectural vocabulary, including various building parts and their functions.
- Students will be able to identify these parts on actual buildings.
- Using their knowledge of building parts and ornament, students will create a brownstone façade with a cohesive design.
- Students will display understanding of the importance of architecture and its preservation.
Supply list
For Fall 2020 we will be providing students with all materials prior to the program commencing via our Building Detectives Kit. However, our program supply list can also be found here.
Session 1: Facades
In our first session we look at one special kind of building we find in our neighborhood: the brownstone (also known as a ‘row house’). We discuss as a group what we already know about brownstones – how old are they? why are they called brownstones? how tall are they? what are they made of? why are they special? Through a group drawing exercise we then learn about the parts of the brownstone ‘facade’, labeling the key architectural features as we go, and learning new architectural vocabulary. The session finishes with students completing their own brownstone drawings, replete with correct labeling!
With assistance from an external webcam and screen-sharing this is able to be completed virtually with our educator providing step-by-step visual instructions to students as to how to draw their own brownstones. The Brownstone Worksheet will be provided in the Building Detectives Kit.
Activities
Session 2: Outdoor sketching
Through close observation of the buildings near their school, and using their background knowledge from session one, students will identify and sketch both individual building parts and an entire façade of a brownstone or apartment building.
This is able to be completed virtually via Google Street View. It may also be possible for our educators to join an outdoor field trip to brownstones near your school. The Building Parts Sketch Sheet will be provided in the Building Detectives Kit.
Activities
Session 3: Building brownstones
Today we construct and design our own brownstone building facades! Drawing on their own knowledge and experience with building parts, each student creates a brownstone/apartment building with cardstock, building part cut outs, and decorates with black pen (NB. All materials will be provided in our Building Detectives Kit). This project makes an excellent classroom display and can be extended upon through a writing project.
With assistance from an external webcam and screen-sharing this is able to be completed virtually with our educator providing step-by-step visual instructions to students as to how to build their own brownstones. All materials required will be provided in the Building Detectives Kit.
Activities
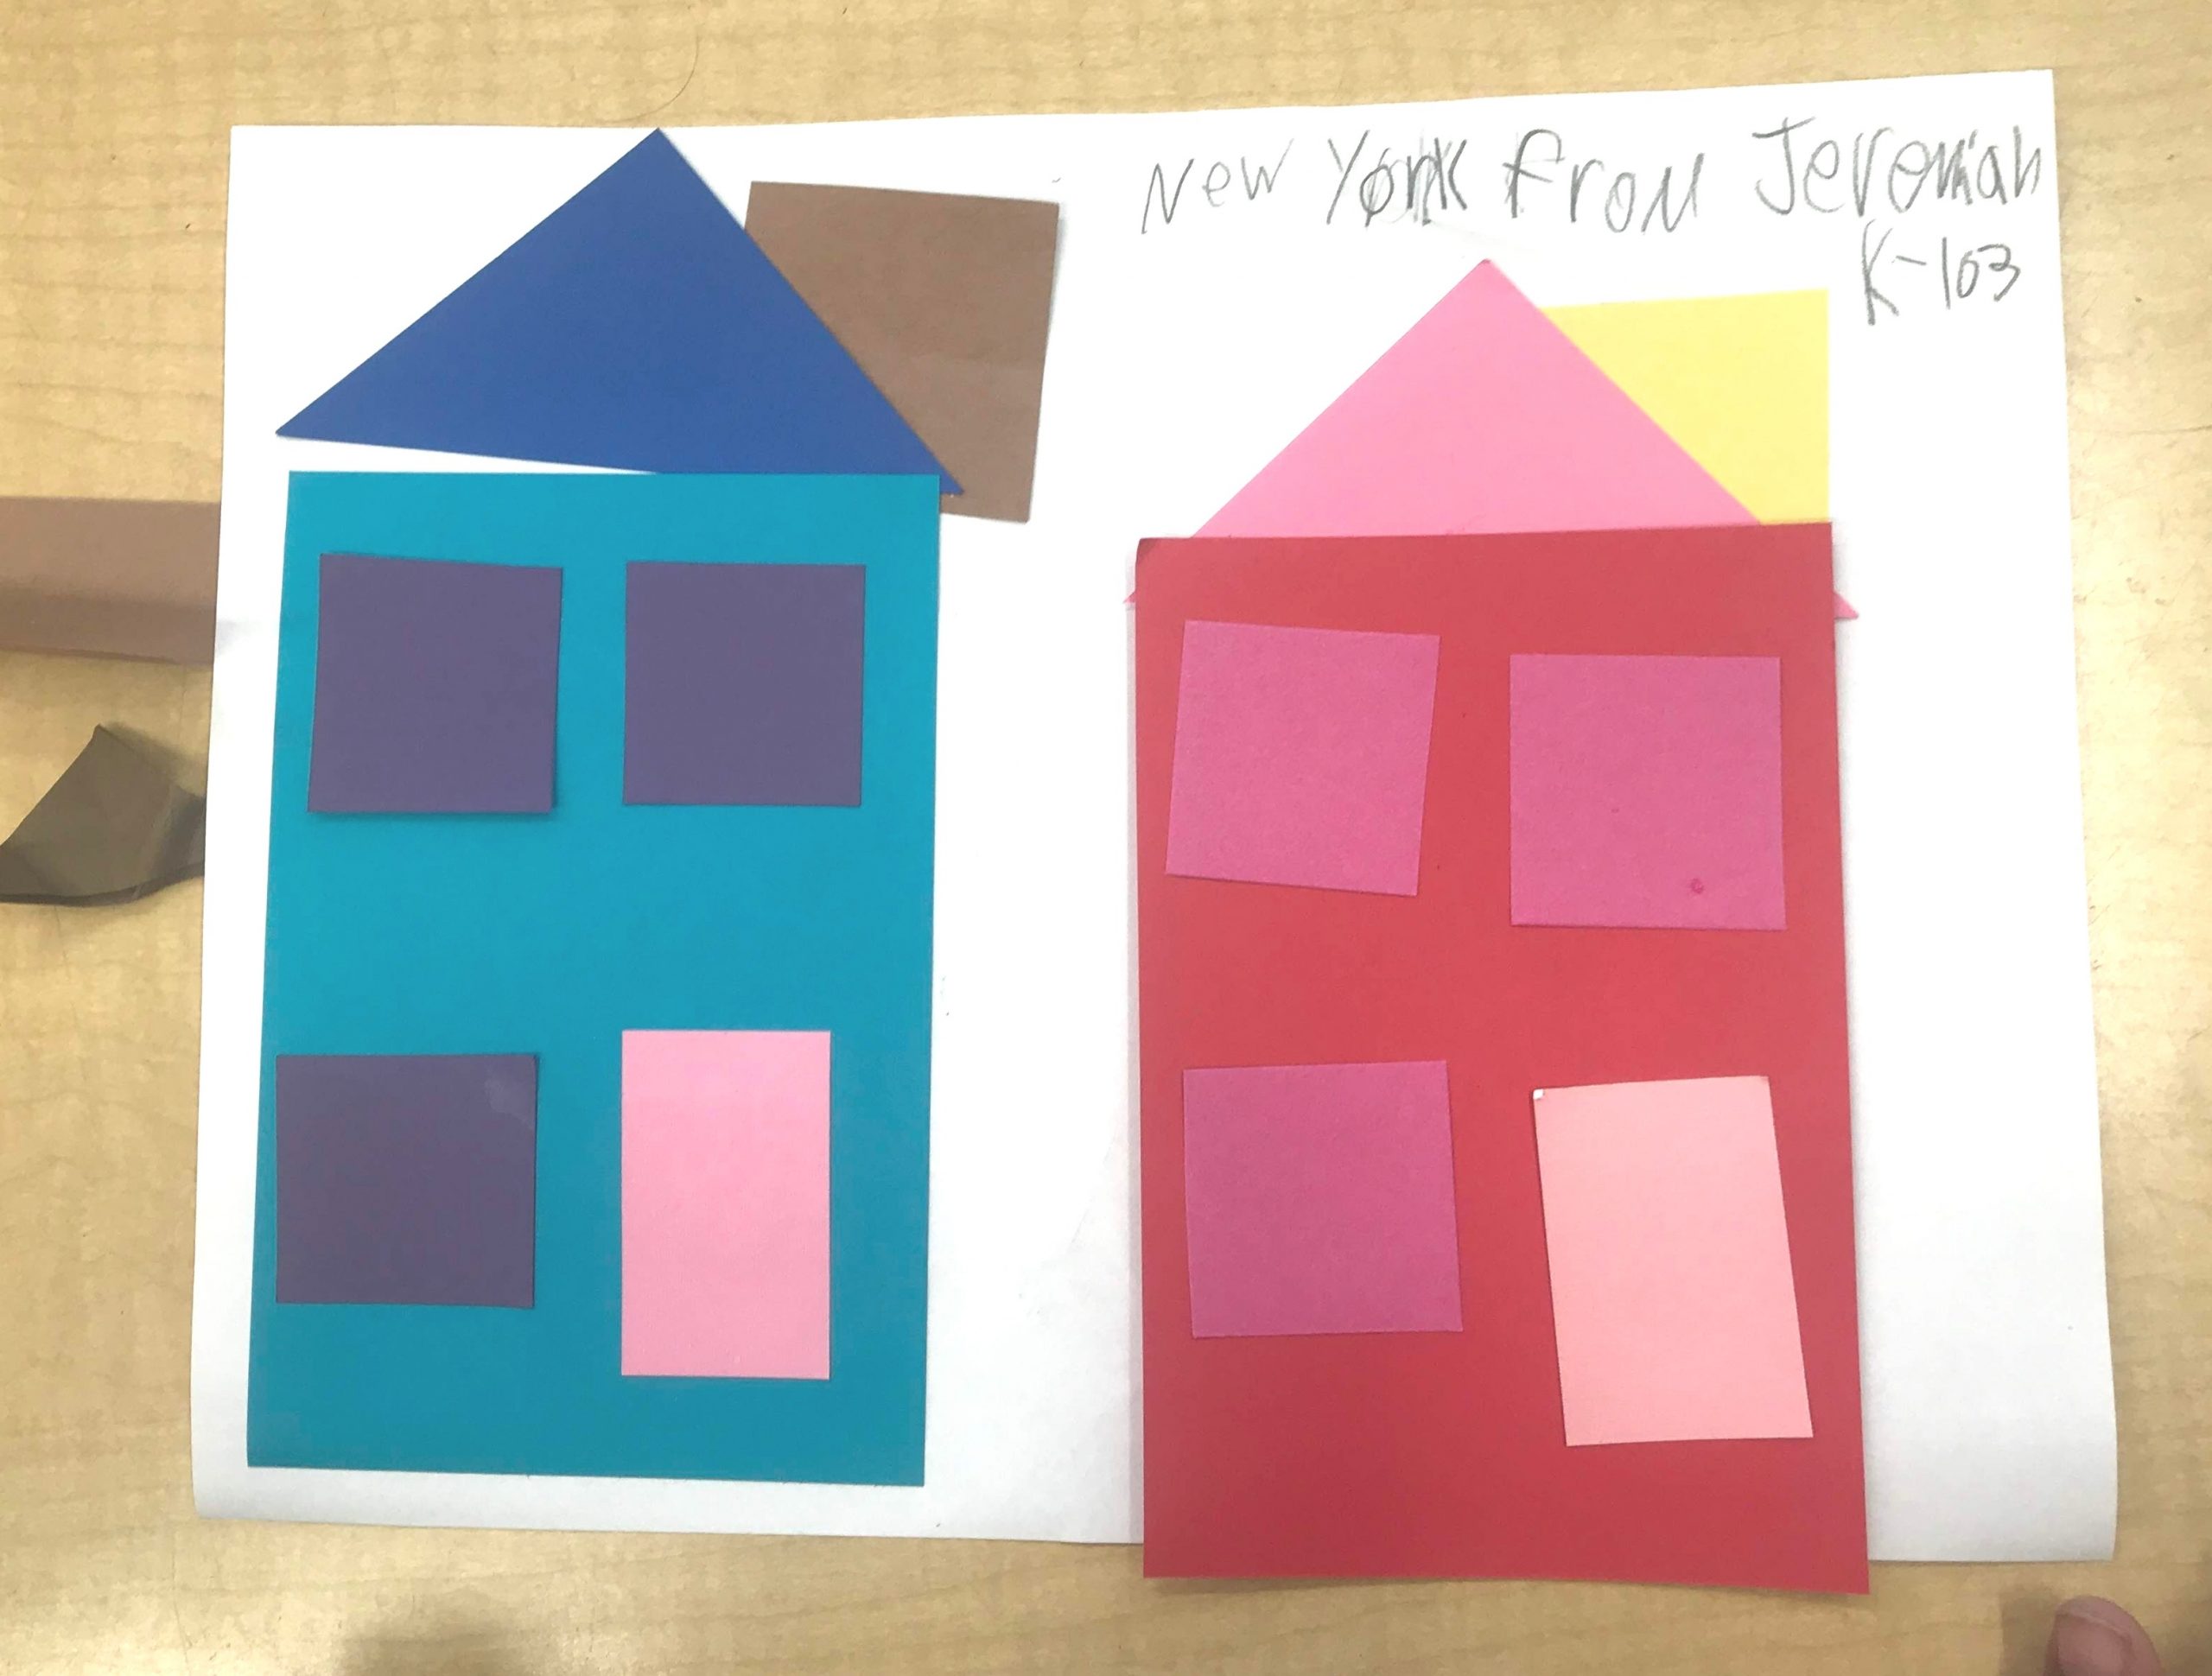
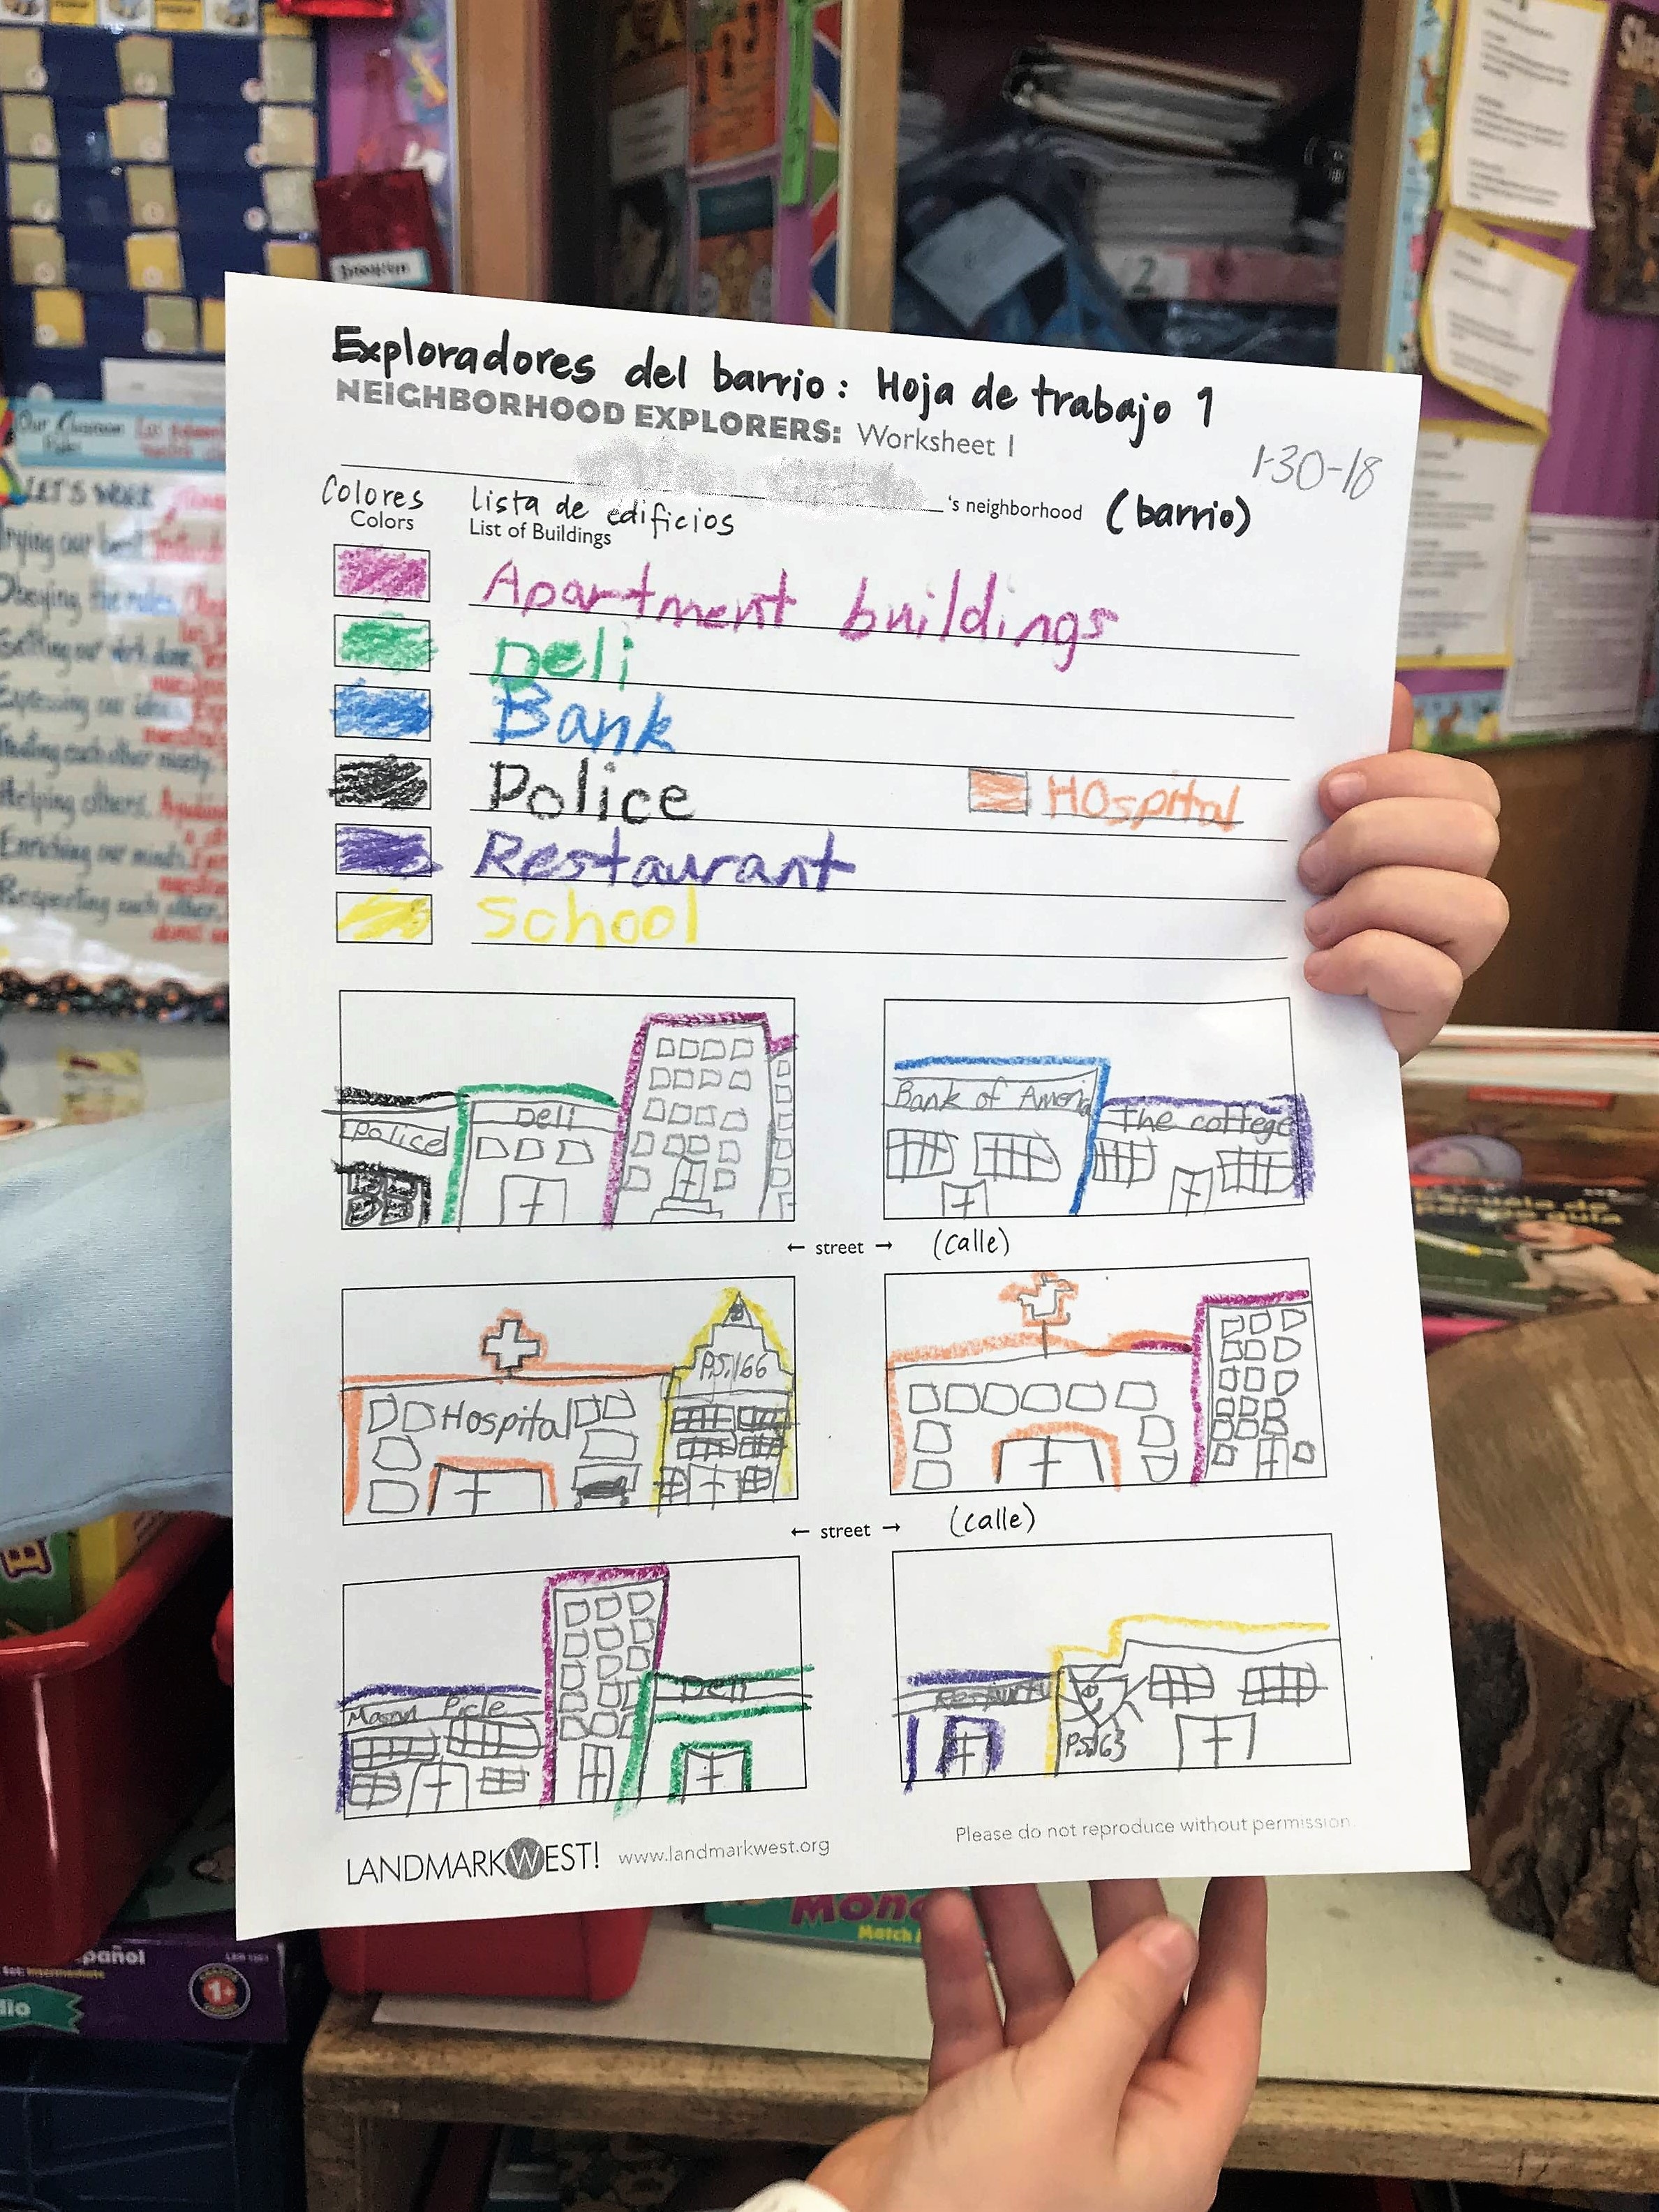
Neighborhood Explorers (Grades 1 and up)
Introduction
Through Neighborhood Explorers, students explore the buildings in the school neighborhood and discover the different components that make up a community. What types of buildings do people live in? Where do people shop and eat? What services do they need? Students design and map their own “ideal” communities, act as official surveyors as they take a walking tour of the neighborhood, and create a three-dimensional streetscape model of the local community.
Program Goals
- Students will explore the types of buildings and services that form a community.
- Students will consider the layout and design of urban neighborhoods.
- Using a checklist of building types, students will survey the buildings in the blocks surrounding their school and discover why particular neighborhoods have more or less of certain types of buildings.
- Using knowledge of local structures and architecture, students will create building façades which, when grouped together, will form a neighborhood model
Supply list
For Fall 2020 we will be providing students with all materials prior to the program commencing via our Neighborhood Explorers Kit.
Session 1: Mapping a Community
In our first session we start with a group discussion about what a community or neighborhood is, and what buildings, places and spaces do we find? As a class we think about and discuss the buildings in our neighborhoods – where we live, learn, shop, play, work and eat. We make a list of places in their neighborhood as a class, and then, via a worksheet, individually create neighborhoods of the students own design, complete with a color key!
Virtually we complete the group list via a shared Google Doc, with students called upon to include their ideas. As an individual or group you may have already thought about these questions before the class, and may have already prepared a list that can then be compared with the one we develop together. Using an external webcam we then guide students to design their own neighborhood, with our educator providing step-by-step visual instructions and drawing along with your students. The Neighborhood Explorers: Worksheet 1 will be provided in the Neighborhood Explorers Kit.
Activities
Session 2: Neighborhood Walk
As for all of our programs, our second session is outdoors! For students to discover their neighborhood and the types of buildings we find, we set off on a walk around the school block (or equivalent). Armed with clipboards and surveys, students identify and tally the various buildings in the blocks surrounding their school. We finish with a discussion of what we observed – what did we see most of? what other places or spaces contribute to the neighborhood?
This is able to be completed virtually via Google Street View, with students ‘surveying’ their neighborhood as our educator ‘walks’ us through the school neighborhood. As this is a virtual walk we can often travel further and spend longer at each stop. We are also able to utilize Google Sheets for students to input their data into once the ‘walk’ is completed, and chart the class results on the spot. This is a great activity to have estimated before the walk that we can then compare with our actual data. Students visual observations can also be extended into a separate writing piece by the teacher.
It may also be possible for our educators to join an outdoor field trip around your school neighborhood. The Neighborhood Survey Worksheet will be provided in the Neighborhood Explorers Kit.
Activities
Session 3: Building a Neighborhood
Our final session brings us to our art project. Drawing on their own knowledge of and experience with buildings in the community each student will create a building façade, which will come together as a class streetscape when placed together. This art activity can be extended upon with a writing activity and makes an excellent classroom display!
Our Neighborhood Explorers Kit will contain materials for each student to design their building, and so we can complete this art project virtually together. Using an external webcam our educator will guide students through their design, and when held up at once, they make a fabulous virtual community! We will work with teachers beforehand to predetermine the buildings to be designed, and can provide photos and examples of the types of buildings we will be building at the start of the session to provide inspiration.
Local History Detectives (Grades 2 and up)
Introduction
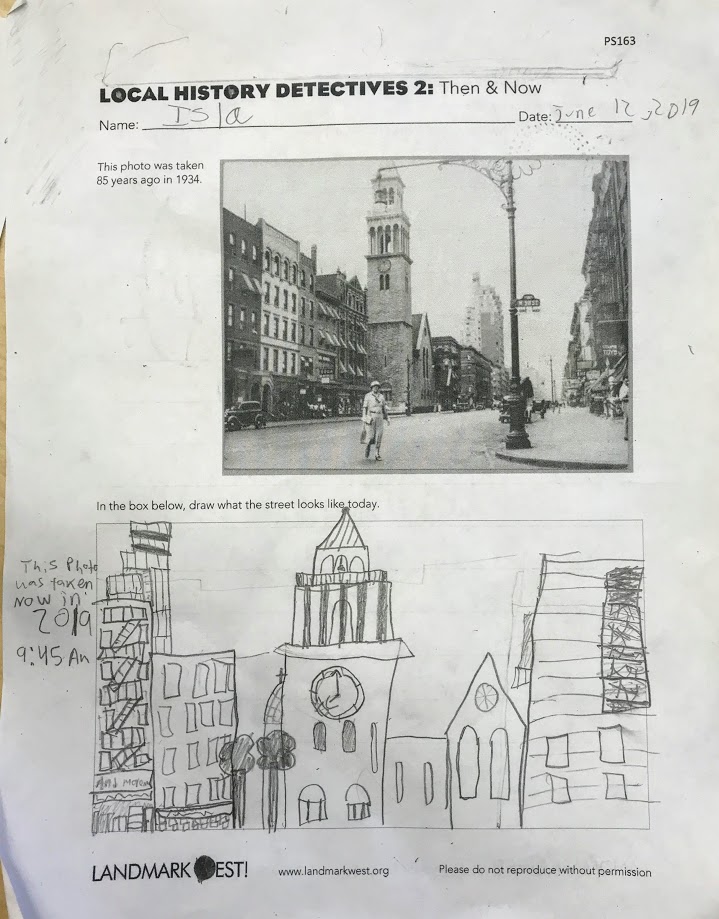
With Local History Detectives, students discover how their neighborhood has changed in the last one hundred years. Using historic photos and maps, students investigate their local school neighborhood to learn about its development and the differences between “then” and “now.” What has been added? What can you no longer see? We use historic photographs to learn about a specific site – a building or intersection – then go on a walking tour to the same site and observe it in the present, noting the similarities and differences between yesterday and today. Finally, using their knowledge of the past and present, they will design and write about their own vision of the future for the particular site.
Program Goals
- Students learn about the history of the Upper West Side and its development.
- Using historic photos and a walking trip, students will see firsthand the change over time for one particular location.
- Students will use their knowledge of the past and present to create a vision of the future.
- We consider the importance of landmarks and what they mean for the future.
Supply list
For Fall 2020 we will be providing students with all materials prior to the program commencing via our Local History Detectives Kit.
Session 1: Historic Photos
Looking at historic images of the Upper West Side, students will discover how the neighborhood has evolved from countryside to cityscape via the construction of the American Museum of Natural History, the 9th Avenue elevated train, and the construction of Central Park. As a group we analyze the photos and discuss what we see – what looks different? what do we notice? are some things the same? If we have time, we finish up with a quick ‘Spot the Difference’ activity.
Virtually we share a similar set of slides and photos of historic images, and analyze the photos as a group, reflecting on what we see and how this compares or adds to what we already know.
Activities
Session 2: ‘Then and Now’ Neighborhood Walk
We venture out into the school neighborhood where students will use a primary document/photograph and their own in-person observations to do a then-and-now comparison of a particular site. We will sketch what we see today and compare it to an historic photo of the same location. Students will write brief observations about what they see is the same and what is different. We choose locations close to the school neighborhood to compare and discuss what the neighborhood used to look like in the late 19th century through to the mid 20th century.
Virtually we take a walk via Google Street View and compare two locations. Our virtual walks are a program highlight, instantly lifting your students back to the streets of their school neighborhood. We ‘walk’ from your school to our location, stopping to look around and comment on buildings and activity in the street. We utilize the ‘past photos’ capability of Google Street View, showing how the location looks different through the seasons, and across years. Our educator guides students through the worksheet via an external webcam, providing step-by-step instructions, tips and inspiration.
Activities
Session 3: Vision of the Future
Using their knowledge of the history of the Upper West Side, landmarks and historic preservation, as well as their experience from the previous session students will draw and write about their specific vision of the future for the site they investigated. We make this a fun, creative activity, asking students to critically think about what they would like to see at this location in the future. Often students include kid-friendly infrastructure and activities, some focus on sustainability, and others focus on transport. It always produces diverse results that the students love to share with their classmates.
Virtually we complete the same activity, with our educator guiding students through how to set up their page, what to focus their work on, and drawing along with your students. Drawing with your students provides ideas, guidance, and the confidence to consider new ideas and how to approach them. At the end of the session we all hold our ‘Visions’ up to the screen and share our ideas and what we have drawn.
Design Detectives (Grades 2 and up)
Introduction
Through Design Detectives, students are introduced to basic architectural concepts, including building parts and their essential contributions to the structure of the building, as well as different styles and their corresponding visual clues. In the first session we introduce students to different architectural elements and styles. In the second session, students go on a neighborhood walk to see firsthand the buildings in their schools neighborhood. Looking at facades, students will note the individual parts they see and how these parts come together to create an architectural style. Finally, students incorporate their knowledge of building parts and architectural styles into the creation of a cohesively designed building façade.
Goals:
- Students learn new architectural vocabulary, including various building parts and their essential functions.
- Students will be able to identify these building parts on actual buildings
- Using visual clues, students will be able to distinguish between different architectural styles that are common to the Upper West Side.
- Using knowledge of building parts and architectural styles, students will draw a facade in the architectural styles learned.
- Students will display some understanding of the concept of historic preservation.
Session 1: Learning Styles through Visual Clues
Using images students are introduced to new building parts and the concept of architectural styles. We explore visual clues to discover differences between styles and how different architectural elements inform the overall look of a building. By looking at a buildings style we can learn about when it was built, where it was built, who built it, and what the building might be used for. We typically focus on two architectural styles, influenced by buildings in the school neighborhood. We finish this session with a ‘spot the visual clues’ worksheet.
Virtually we use the same images and discuss as a group what the images are of, what we can see in the images, and what they remind us of. Focusing on two architectural styles we learn three or four of their visual clues that tell us what style we are looking at. Guided by our educator, we draw these visual clues together, learning where each piece goes, and why it is important. Students often make connections to other areas of learning during this session.
Activities
The worksheets are generally tailored to each school neighborhood, with these providing an indication of what to expect:
- Design Detectives 1: Gothic Revival Architecture
- Design Detectives 1: Romanesque Revival Architecture
Session 2: Neighborhood Walk
Our neighborhood walk allows students to see firsthand the buildings in their school neighborhood, reinforcing the visual clues we learned about in the first session. Looking at facades, students will note the individual parts they see and how they come together to create an architectural style. Looking at the buildings of particular styles, students will observe and identify the buildings’ features and styles. For their facade drawing, students will focus on the details, and to include features that make this particular building different from its neighbors.
Virtually we use Google Street View to take our neighborhood walk, starting at your school and walking the streets of the Upper West Side to our destination. A virtual walk has the added bonuses of being able to travel further than we normally can in a period, plus visit more buildings! We also use the walk time to point out other buildings of interest and explain a little more local history. Students enjoy visiting their school neighborhood, particularly when we ‘walk’ past places they know. We complete two facade drawings on our virtual walk, one for each architectural style we are studying. Our educator guides students through the drawing including how to start the drawing – where, and what shapes – and breaks down the drawing into manageable pieces. Students are often amazing and their ability to draw relatively complex facades when using this approach.
Activities
The worksheets are generally tailored to each school neighborhood and the architectural style we are studying, with these providing an indication of what to expect:
- Design Detectives 2: Dutch Revival Sketch Sheet
- Design Detectives 2: Architectural Styles Sketch Sheet
- Design Detectives 2: Gothic Revival Sketch Sheet
Session 3: Drawing Facades
Drawing on their architectural style knowledge from the first two sessions, and how to draw various building parts, students now design a building for a vacant lot between two buildings. They may think about the buildings they have seen in the neighborhood and drawings we have completed on our neighborhood walk as reference and inspiration. The new building should use the visual clues of one of the architectural styles we learned about, and should be designed in a similar ‘scale’ to its neighbors on either side.
In our virtual lessons we also encourage students to design their own building using the knowledge learned in the program, but also their imagination and own creativity. After teaching students the ‘building blocks’ of architectural styles we have empowered them to embark upon their own designs, many of which often draw from both the architectural styles we have learned about together with their own ideas. It’s a fun way to round out the program, and allows students to be architects in their own right.
Activities
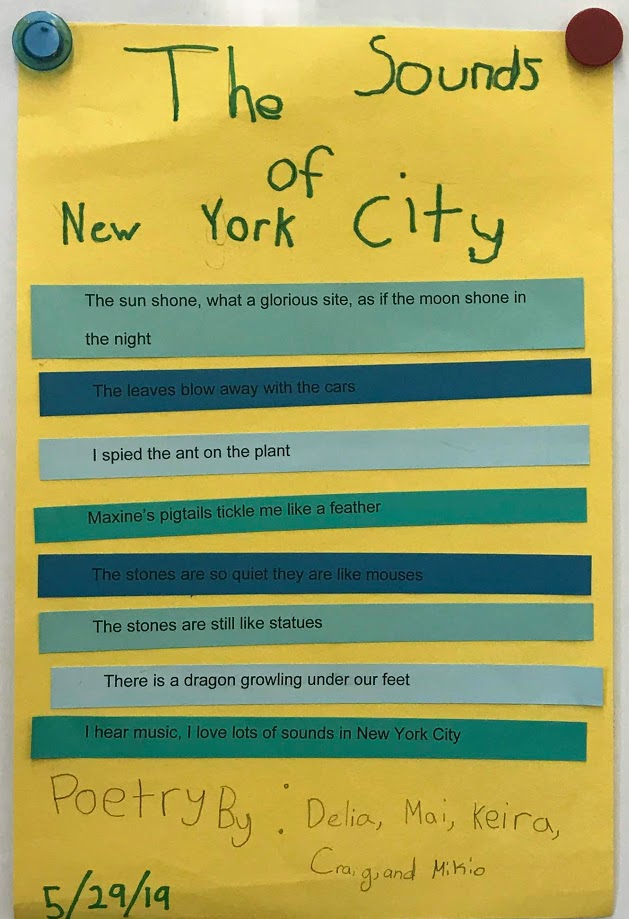
Neighborhood Poetry (Grades 2 and up)
Introduction
Through Neighborhood Poetry, students explore how buildings, gardens and streets in their neighborhood can serve as inspiration for creating poems. In the first session, students explore poems about architecture and their accompanying illustrations and practice visualization. In the second session, we head outside to make observations about an actual space (e.g. building, garden, street), sketching and writing brief phrases about what they see. In preparation for the final session, our team types up and cuts the students’ observations into strips, bringing them back to the classroom where students work in their table groups to create their own poems inspired by our trip the week before.
Program goals
- Extend poetry learned in the classroom and practice visualization skills.
- Challenge students to look UP and around to notice architecture and details that they might not have noticed before, and how they might describe these things in a sensory way.
- Invite students to look at buildings in a new way: not only as places to live, learn, eat, etc. but as works of art themselves and inspiring of other forms of art.
- Encourage collaboration and cooperation as students work together to create poems made up of their classmates’ observations.
Session 1: Urban Poetry & Visualization
In our first session we explore how poets write about buildings and neighborhoods in much the same way as an artist may draw or paint a scene on a city street. Using poems and illustrations by Lillian Moore we discuss poetic language devices (rhyme, personification, repetition etc) and think about how to create an image through language. As a group we firstly use illustrations to look for clues as to what a poem may be about, before taking on the individual task of drawing what you visualize when you hear the poem read aloud only.
We approach this session the same way virtually, reading aloud Lillian Moore’s poetry and sharing screens to show her vivid and detailed illustrations. Students can raise their hands or use a chat function to ask questions and discuss what they see. Individually they draw their own picture for the final activity, and share with the classmates at the end.
Activities
Session 2: Outdoor Observation
Using their experience with poetic language from the first session, we venture outside to explore what sensory observations we can make in our school neighborhood. Once at our pre-planned location, students note their observations about the location which will later be compiled into a class poem. Their sketches will serve to illustrate the poem, and can additionally make a wonderful class project to share with your families.
Virtually this session can be approached in several ways. If possible, an outdoor trip, even to the school yard, will provide the best sensory experience for students. In this scenario we encourage and challenge students to explore the space differently than they may be used to – what do they hear? how does it make them feel? what textures and materials do you notice? are there insects? If this is not possible, we can use the space where students are (home or school) and still ask the same questions – what do you see from your window? what colors do you see? how would you describe them? can you hear the traffic? does it sound fast or slow? Students can complete their sketch and observations as in the classroom, but would need to submit their notes to our educator for use the following week.
Activities
Session 3: Class Poetry
For our final session the class works in small groups (typically their table groups) to create their own poem. The components of the poem are students’ observations from the previous session. We have an opportunity at the end of this session for each group to present their poetry to the class. This project can also make a great classroom display, a published poetry book for the class, or serve as a ‘publishing party’ for families to also attend.
Virtually, this session requires a little pre-planning with students observations to be distributed, and students groups to be arranged, beforehand. Alternatively, each student can be given a selection of observations and can create an individual poem.
Landmark Explorers (Grades 2 and up)
Introduction
How can we protect our buildings? Why should we protect buildings and places? Why is this important? In this program we critically explore and think about why buildings should be landmarked, and what is important about this place or building. We learn what a landmark is, how they are designated, and explore some of the landmarks in the city and neighborhood. We will visit local landmarks and discuss why they are important to the community, and nominate our own buildings or places for landmark designation.
Program goals
- Students learn how landmarks are identified and protected in New York City, including the different types of landmarks, how our Landmark Laws are developed, and how to advocate for protection for a building or place.
- Students will learn about designated landmarks in New York City and in the Upper West Side, and be able to identify some in our local neighborhood.
- Students will survey landmark buildings in the blocks surrounding their school and critically thinking about why these buildings are important and are protected.
- Using knowledge gained, students will nominate buildings or places for landmark designation.
Session 1: Learning about Landmarks
How are landmarks identified and protected in New York City? Using images and an oversized LW! Landmarks Map we discuss as a group what landmarks are, the different types of landmarks, how Landmark Laws were developed, and how we advocate for the protection of special places. Students particularly love our oversized Landmarks Map and we spend time as a group exploring the neighborhood – what can we spot? where are we now? where do I live? what do the different colors mean? Students are given smaller maps to take home to continue exploring and learning with. If time permits, we read Old Penn Station by William Low, exploring his wonderful illustrations as he tells the tale of how New York’s Landmark Laws developed.
Virtually we can explore maps available online, still learning about our neighborhood and what we see and know about landmarks. As a group we discuss what landmarks are, and we read and explore Old Penn Station together.
Session 2: Landmarks in your neighborhood
We are very fortunate to live in a neighborhood with such a range of landmarks within walking distance! For our neighborhood walk we select one or two existing landmarks to see, draw and discuss. Students complete a ‘five minute sketch sheet’ challenge for a part of each landmark, and we discuss why it is a landmark, and why it is important and protected. We may also visit a building or space on LW!’s Landmark Wishlist – a building that we’d like to be included as a landmark but isn’t yet.
Virtually we use Google Street View for this session, walking students to local landmarks, discussing with them what they may already know about the landmark, and completing a five minute sketch as well. We finish the session by sharing our landmark sketches and asking what the students noticed about the buildings.
Activities
- Landmark Explorers 2: Five Minute Sketch Sheet
- Landmark Explorers 2: IRT Powerhouse (worksheet alterative)
Session 3: Landmark Nominations
Which building or space do you think should be nominated to become a landmark? As a class we explore how a building becomes a landmark and talk about some buildings on the LW! Landmark Wish List that we’d like to be nominated. Students then complete their own landmark nomination, including reasons for why it should be landmarked, and drawing a sketch of the place.
In our virtual session we select a smaller number of Wish List buildings to choose from, and discuss each briefly. Students then complete their nomination as if in class.
Activities
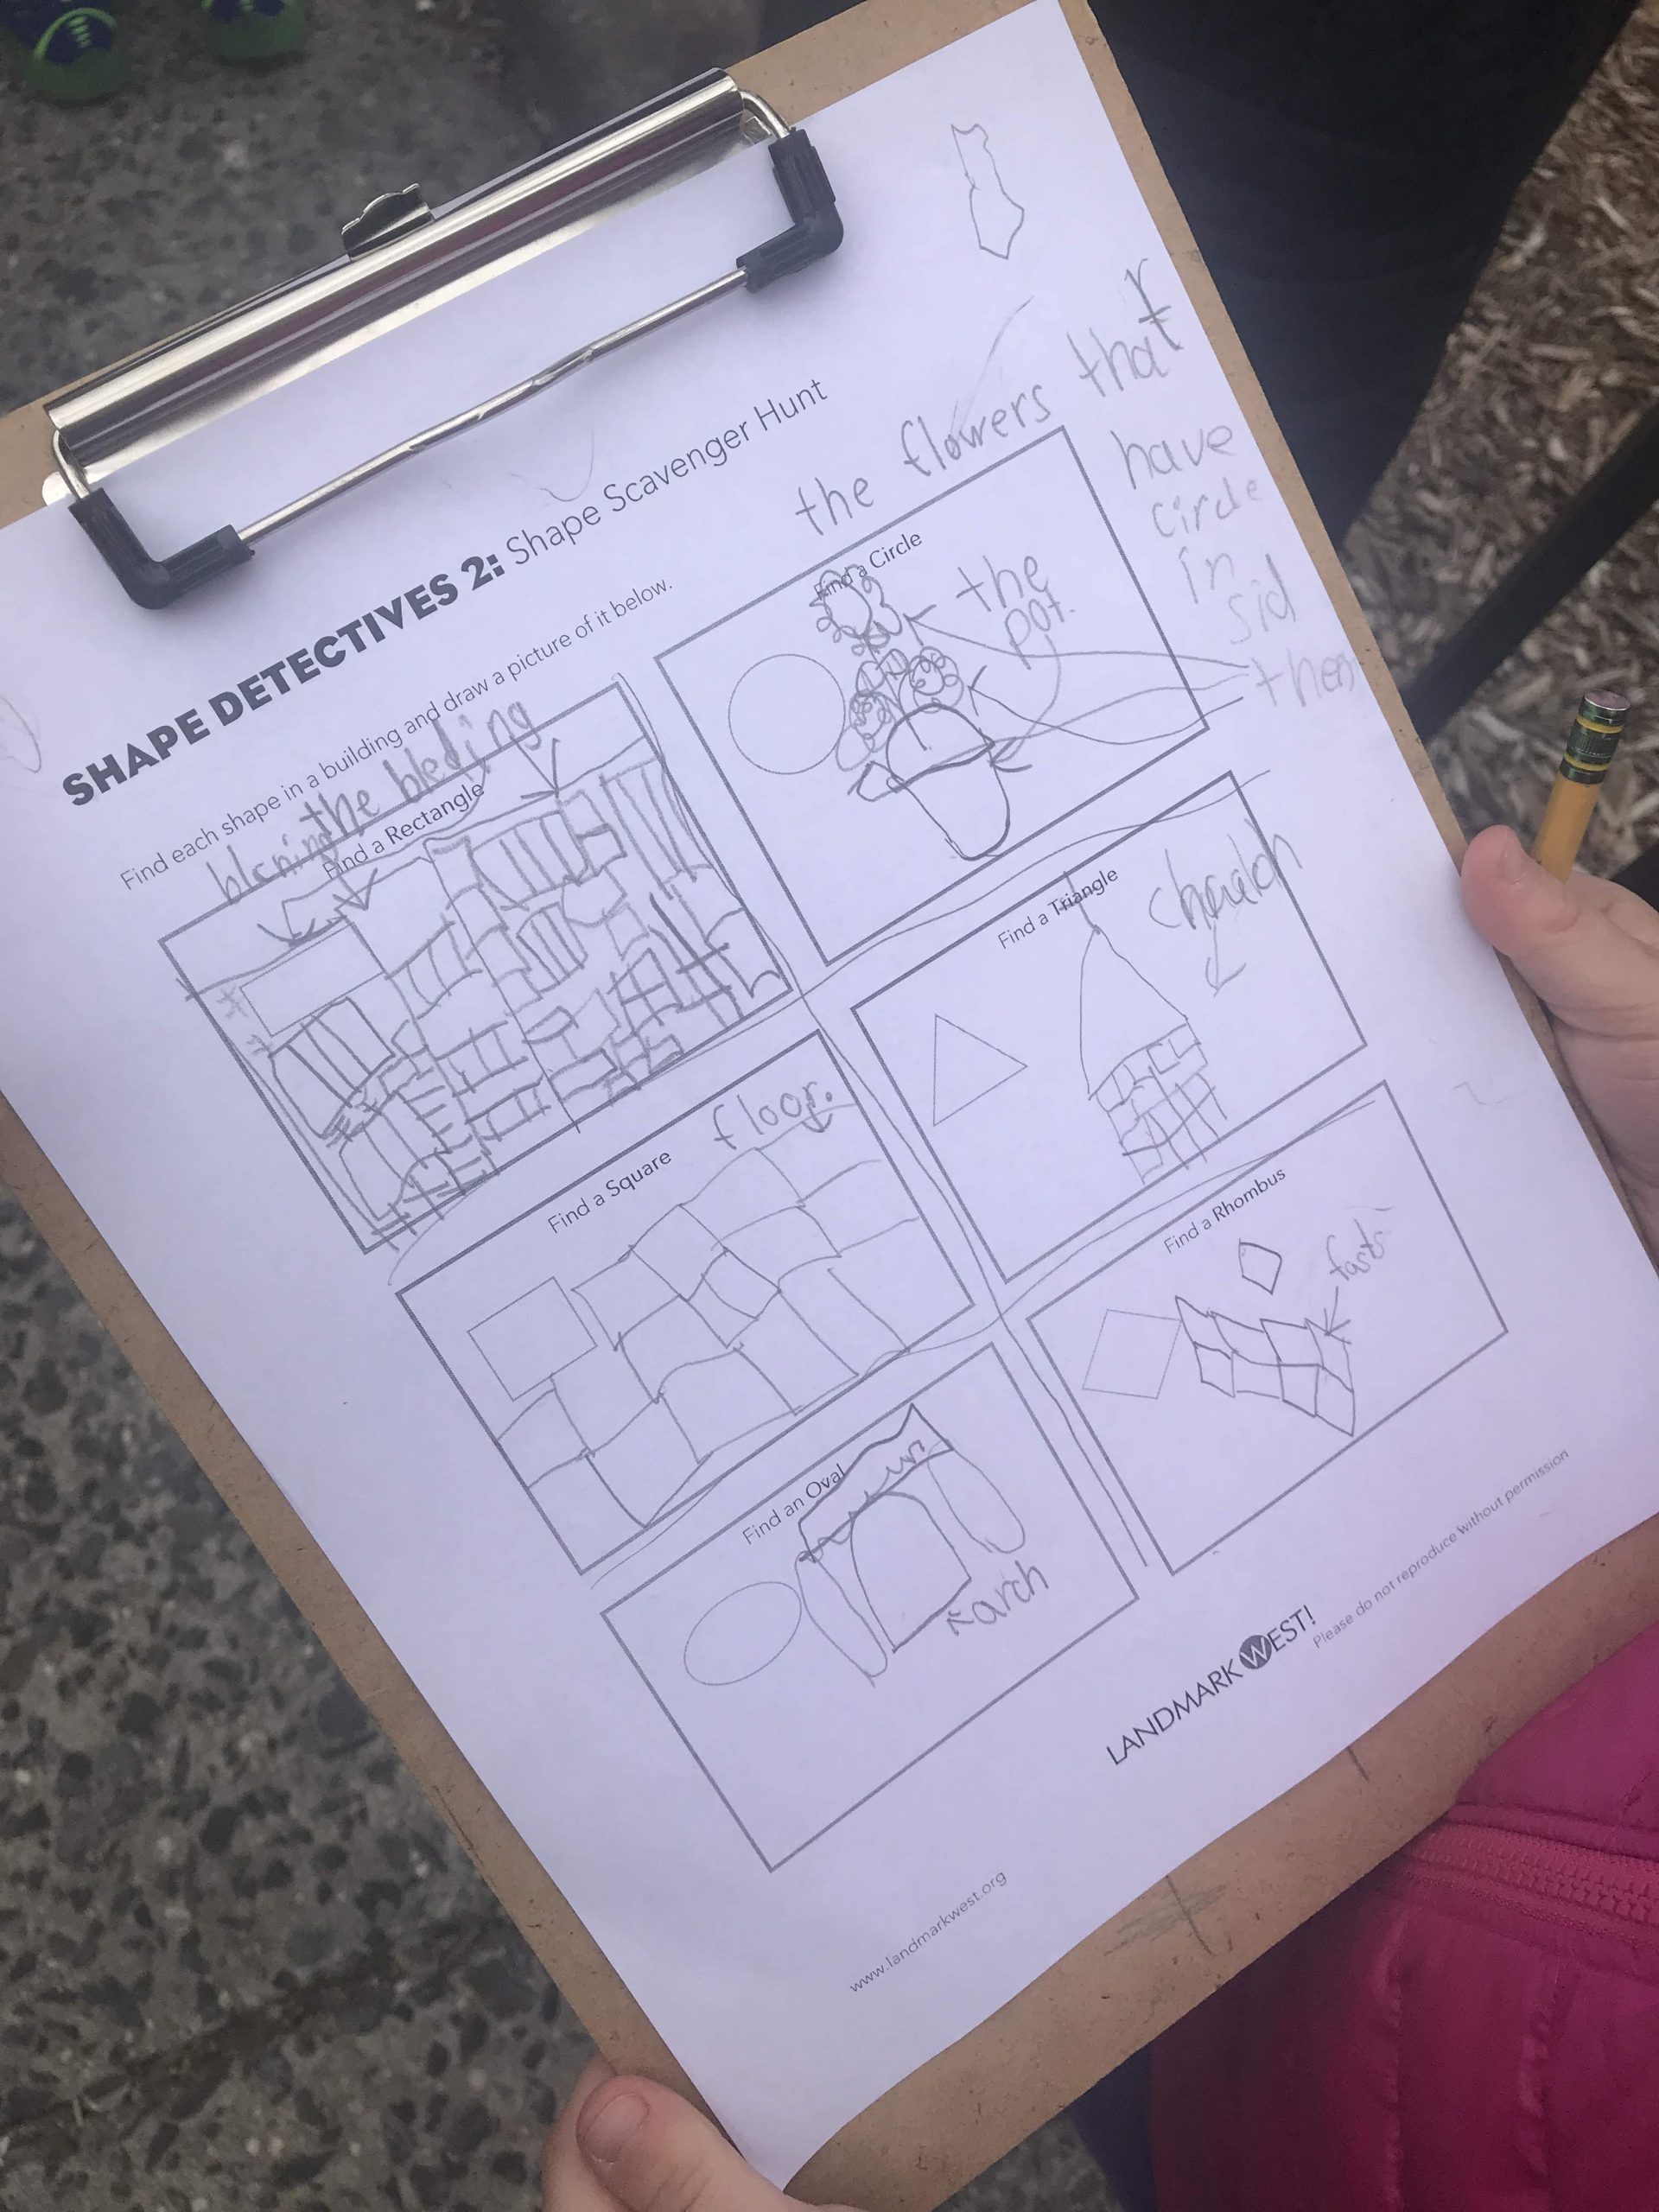
Shape Detectives (K and Grade 1)
Introduction
Through Shapes Detectives, students explore the basic elements of buildings and how these parts contribute to the larger structure. In the first session we identify shapes in buildings, and learn how multiple shapes together create different shapes. In the second session students go outside to identify shapes in buildings, gardens and on the street. We may also stop to sketch building facades, identifying the shapes we find. In our final session students are provided with pre-cut shapes and are asked to design and construct a building out of these.
Program goals
- Students identify shapes in buildings by name and color.
- Students find shapes in photos, buildings and on the street, and learn how new shapes are created by putting several shapes together.
- Using their knowledge and experience with building parts, students can create other shapes and buildings.
Session 1: Finding Shapes in Architecture
Shapes are all around us! In the classroom, in our buildings, and on our streets. This session focuses on identifying shapes we see in buildings and we start by reading The Shape of Things by Dayle Ann Dodd, a book students are often familiar with. Then, using building photos, students work as a group to identify the basic two-dimensional shapes they see, and discuss similarities and differences in shapes and buildings. Our educators emphasize how buildings are made up of all different shapes, and when we put them together they create a new shape/building. Returning to their tables, each student then completes a ‘spot the shape’ activity, coloring different shapes according to the color key provided.
Virtually we practice spotting shapes in buildings by sharing pictures of buildings in the neighborhood and students join in and share what shapes they can see. As an alternative to the ‘spot the shape’ activity, our educators provide step-by-step instructions on how to draw a local landmark – the New York Cancer Hospital at 455 Central Park West. Sharing our webcam, our educator breaks down the building into shapes students know, and they draw together to create their own drawing of this landmarked building.
Activities
Session 2: Finding Shapes Outside
For students to discover shapes in their neighborhood and buildings, we set off on a walk around the school block (or equivalent). Students are each provided with a shape (six different shapes). As we walk, students hold their card up if they see that shape. They are asked what the shape is, where it is, and to describe what they see (e.g. the square is part of the window). Once back at the school, students share their observations. An extension of this session is for students to participate in a ‘shape scavenger hunt’ where they are asked to draw the shape they find in context.
Virtually we complete this activity via Google Street View. Students are given shapes to cut out at home and, as we walk the school neighborhood, hold up the shapes they see.
Activities
- Shapes template (to cut out)
- Shape Detectives 2: Shape Scavenger Hunt
Session 3: Making a Shape Collage
Drawing on their own knowledge of and experience with building parts and shapes, each student creates an architectural shape collage. Using cardstock and pre-cut shapes that we provide, each student designs and makes their own building. We encourage color for decoration! These make a wonderful classroom display!
Virtually we complete the same activity. Using pre-cut shapes and our educator guiding students step-by-step via a webcam, students create building and street designs of their own, putting together the shapes in their own arrangements and adding finishing touches with markers and pencils.
Activities
- Shape template (to cut out)
Urban Preservationists (Grade 8)
Introduction
Using the Upper West Side as our case study, this program explores the development of NYC and the UWS through the 1840’s to WWII, specifically considering the push-pull factors that led to the development of the UWS, and what evidence we find of that today. Using our neighborhood, we examine the ideas behind historic preservation, and the impacts this has on our neighborhood today, including how we, as citizens, can shape our environment. Students will develop their knowledge of UWS architecture to a walking tour and to independent research on school buildings in their neighborhood without formal protections. They will then apply that knowledge to a debate concerning the role that preservation plays in their communities.
Program goals
- Students will gain knowledge of the development and history of the Upper West Side through World War II.
- Students will conduct a walking tour of their neighborhood to observe what buildings have been preserved and changed.
- Students will form their own opinion about whether preservation helps or hinders their community.
Session 1: An Upper West Side History
Activities
Session 2: What is Historic Preservation?
In the second session, we learn about historic preservation, both in New York City history and in practice right here on the UWS. We discuss the destruction of the original Penn Station and how it became a catalyst for preservation and landmarking in the city. After learning about the different types of landmarks, we explore the application of historic preservation on the UWS.
This session also introduces students to our final project, a classroom debate about whether or not historic preservation helps or hurts communities. Students are introduced to resources to help them begin their own research, including videos and articles, and we begin helping them form their teams and opinions.
Activities
Optional Session 3: Neighborhood Walk
We offer the option of a neighborhood walking tour before final presentations. Students will accompany us on a curated trip to a local landmark near to their school, observing which parts of their community are historically designated or not. We take time to reflect on and compare the difference, then learn the history of a local building. This tour helps give students added context for their debates, as well as an example of a real landmarking case to discuss and cite in their presentations.
Session 4: Classroom Debate
On our final day, students will debate with their teams the question: does historic preservation help or hurt communities? Debates are structed such that each side has space for introductions, rebuttals, questions, and conclusions. There are no right or wrong answers in this debate, and students will use their time to present their research and form as strong an argument as possible.
Urban Historians (Grade 8)
Introduction
Using the Upper West Side as our case study, this program explores the development of the UWS from WWII through to present day, specifically exploring the shifts in population and demographics on the UWS and how this influences our urban landscape and what evidence we find of this today. Using our neighbourhood, we learn how the changes we see in it today track with broader societal changes across the US, and contemplate what future changes will bring.
Program goals
- Students will gain knowledge of the development and history of the Upper West Side tafter the 1940s.
- Students will explore how demographics, migration, and immigration trends have shifted over time on the UWS.
- Students will conduct research into local buildings and locations around their school to present to their peers.
Session 1: A Post-War Upper West Side
Activities
Session 2: A Deeper Look at the Neighborhood
In the second session, we introduce students to the topics of their final projects. We will present students with a series of locations near to their school, as well as an overview of their histories. Students will divide into small groups, and each group will select a building to be the subject of their research projects.
Their goals will be to reconstruct a history of this location, combining both observations of the present day built environment with what it looked like and functioned as in the past.
Session 3: Neighborhood Walk or Research Preparation
We offer the option of a neighborhood walking tour before final presentations. Students will accompany us on a curated trip to a local landmarks near to their school, allowing them to see in person their project subjects. Classrooms can also use this time as in-class research preparation instead.
Session 4: Presentations
On our final day, each student group will guide the rest of the class on a “tour” of their chosen location. They will present their findings, which could include primary and secondary sources, deomographic information, historical accounts, and more. As a class, we will go on a tour through the recent history of the neighborhood.
Inquiry form
Use the form below to request more information about our programs.
Or contact us at education@landmarkwest.org
KPF Inquiry Form
Resources
Activities
Draw Brick! from Brick:Who Found Herself in Architecture from Phaidon Children’s Activity Packs
Draw Easy Buildings from Art Projects for Kids
Draw 3D Buildings from Art Projects for Kids
Architecture Scavenger Hunt from PBS for Parents
Design A House from Little Bins for Little Hands – scroll all the way to the bottom for the actual downloadable STEM project, but the videos and instructions they provide on the way are also amazing.
Skyscraper Line Drawing from Deep Space Sparkle
Books
When Jackie Saved Grand Central by Natasha Wing
Before she was an iconic First Lady of the United States, Jackie Kennedy was a born-and-raised New Yorker. She loved everything about her city, from the natural beauty of the parks to the architectural history of the buildings. So when the owners of Grand Central wanted to build a skyscraper on top of the famous train station, Jackie knew they had to be stopped. She helped inspire thousands of people to come together and fight to protect the historic landmark. From letter-writing campaigns all the way to the Supreme Court, this little-known story celebrates winning in the face of immeasurable odds and how one person can make a big difference
Old Penn Station by William Low
During the first half of the 20th century, the original Pennsylvania Station was one of New York City’s grandest landmarks, a palace in the middle of Manhattan. William Low’s glorious illustrations pay close attention to detail while still encompassing the large-scale grandeur of Penn Station. Old Penn Station follows a very specific piece of New York City history, but it’s not just a New York book. The author’s research carefully addresses the whole history of the building, from construction to destruction, ending with an acknowledgment of its lasting legacy in terms of historical preservation.
Online Activities
Maps – Discover NYC Landmarks – https://www1.nyc.gov/site/lpc/designations/maps.page
This map displays Individual, Interior, and Scenic Landmarks, as well as Historic Districts in all five boroughs. The map also provides detailed building-by-building information for all buildings within historic districts. Users can click on designated buildings and sites for additional information such as building information, photos and designation reports.
Acknowledgements
KPF is made possible by the contributions of former Council Members Ben Kallos and Mark Levine, as well as the Department of Cultural Affairs (DCLA). It is also made possible by the New York State Council on the Arts (NSYCA) with the support of the Office of the Governor and the New York State Legislature. With their support, Landmark West’s KPF program offers a suite of seven 3-part courses aligned with the NYC Core Curriculum in Upper West Side public schools for free every year.